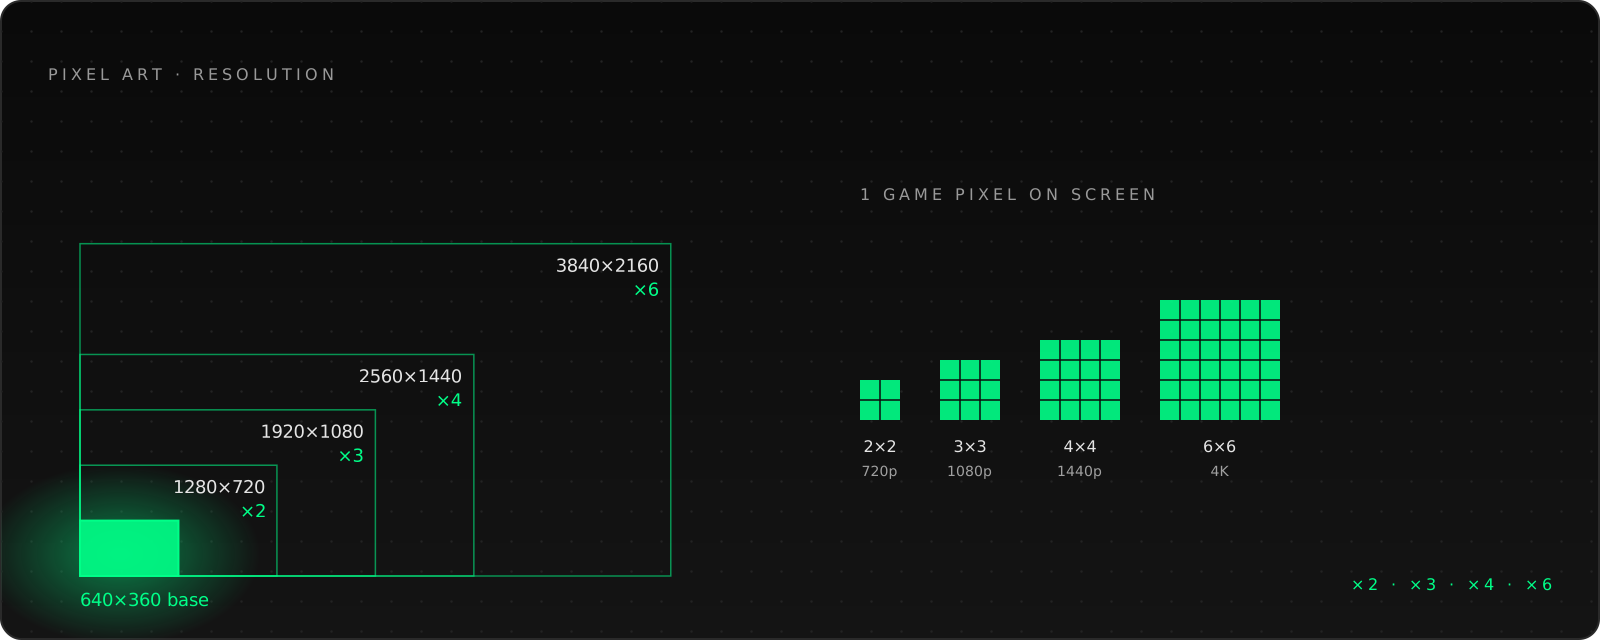
Before you draw a single tile, your pixel art game has already made two decisions for you—or you make them on purpose. The first is the base resolution: how many pixels wide and tall your game world really is. The second is the sprite size: how many of those pixels a character or a tile gets.
Both numbers sound technical, but they shape everything that follows: how much detail you can show, how many frames you can afford to animate, and whether your art looks crisp or smeared on a modern monitor. Change them halfway through a project and you redraw your assets. That’s why I always settle them first.
In this tutorial, you’ll pick a base resolution that scales cleanly to common screens, compare 16, 32 and 64 pixel sprites, and see what each choice costs you in drawing time. At the end there’s a short section on how to lock the settings into Godot 4. A full engine guide follows in a separate tutorial.
What You’ll Need
- A pixel art editor (I use Aseprite; see the Aseprite beginner guide if you’re new to it)
- The basics from Pixel Art Fundamentals—canvas setup and the pixel grid
- A calculator or a spreadsheet—the math is simple, but you’ll check it a few times
- 30 minutes
Step 1: Separate the Two Numbers
Beginners often mix up base resolution and sprite size, so let’s pull them apart.
Base resolution is the size of your game’s internal canvas. If your base resolution is 640×360, the whole visible world is 640 pixels wide and 360 pixels tall—no matter whether the player sits in front of a laptop or a 4K TV. The engine draws everything at that size and then enlarges the finished image to fill the screen.
Sprite size is the size of one asset on that canvas: a 16×16 tile, a 32×32 character, a 64×64 boss. It decides how much room you have for detail inside a single object.
The two numbers only make sense together. A 32-pixel character on a 640×360 canvas takes up the same share of the screen height as a 16-pixel character on a 320×180 canvas: about 8.9 % in both cases (32/360 and 16/180). Same look on screen, very different amount of pixels to draw.
Step 2: Pick a Base Resolution That Divides Cleanly
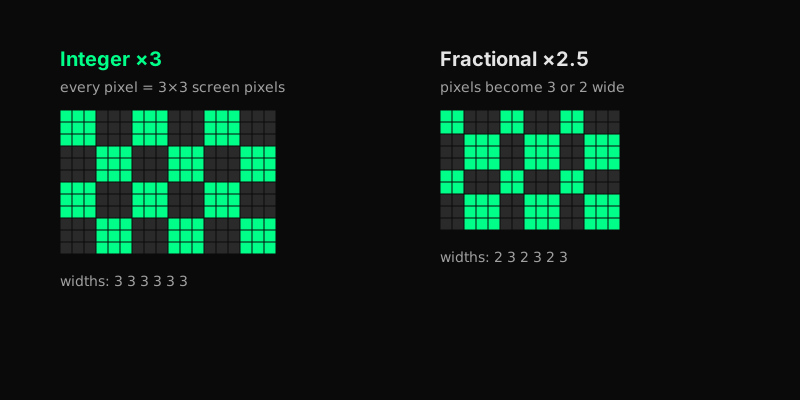
Pixel art has one golden rule on modern screens: every game pixel must become the same number of screen pixels. If one pixel turns into a 3×3 block, all of them must. That’s called integer scaling, and we’ll see in Step 3 what happens without it.
So the question isn’t “which resolution looks nice?” but “which resolution multiplies cleanly into the screens my players own?” The common 16:9 targets are 1280×720 (720p), 1920×1080 (1080p), 2560×1440 (1440p) and 3840×2160 (4K).
The Godot documentation on multiple resolutions gives a useful frame: most pixel art games use viewport sizes between 256×224 and 640×480, and 640×360 is called a good baseline because it scales to all four targets without black bars when you use integer scaling. Let’s verify that:
| Target | Calculation | Factor |
|---|---|---|
| 720p | 640×360 × 2 = 1280×720 | ×2 |
| 1080p | 640×360 × 3 = 1920×1080 | ×3 |
| 1440p | 640×360 × 4 = 2560×1440 | ×4 |
| 4K | 640×360 × 6 = 3840×2160 | ×6 |
Every factor is a whole number. That’s the whole trick.
If you want chunkier pixels, halve it: 320×180 scales by ×4 to 720p, ×6 to 1080p, ×8 to 1440p and ×12 to 4K—also clean across the board. GDQuest’s pixel art setup guide lists 320×180, 426×240, 568×320 and 640×360 as 16:9 starting points, and suggests starting with a 16:9 ratio.
My rule of thumb: start with 640×360 or 320×180. Both keep every common 16:9 screen on whole-number factors.
Step 3: Check Integer Scaling Before You Commit
Not every 16:9-ish resolution behaves this well. Here’s what happens with a few other candidates:
| Base | 720p | 1080p | 1440p | 4K |
|---|---|---|---|---|
| 320×180 | ×4 | ×6 | ×8 | ×12 |
| 640×360 | ×2 | ×3 | ×4 | ×6 |
| 480×270 | ×2.67 | ×4 | ×5.33 | ×8 |
| 426×240 | ×3 (width 1278) | ×4.5 | ×6 (width 2556) | ×9 (width 3834) |
480×270 fits 1080p and 4K perfectly, but not 720p or 1440p. 426×240 is close to 16:9, but not exact: at ×3 it becomes 1278×720, two pixels short of 1280.
What does the engine do when the factor isn’t whole? Two options, and both have a price:
- Fractional scaling stretches anyway. Some game pixels become two screen pixels wide, their neighbors three. Godot’s documentation states plainly that this leads to uneven pixel scaling and an incorrect appearance of pixel art. You see it as wobbly lines and shimmering when the camera moves.
- Integer scaling rounds the factor down to the next whole number and fills the rest with black bars. 426×240 on a 1080p screen gets ×4 instead of ×4.5, so the image is 1704×960 with bars of 108 pixels left and right and 60 pixels top and bottom.
Black bars aren’t a disaster—plenty of players accept them. But if you can avoid them by choosing a cleaner base resolution on day one, why wouldn’t you?
Step 4: Choose Your Tile and Sprite Size
Now for the size of your building blocks. 16, 32 and 64 pixels are the usual steps, each doubling the side length of the one before.
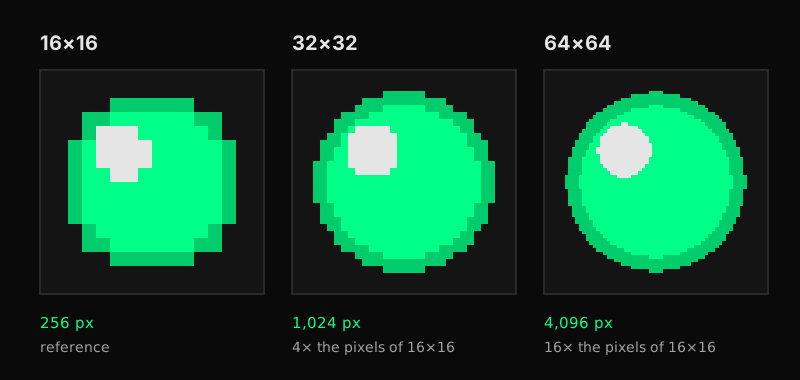
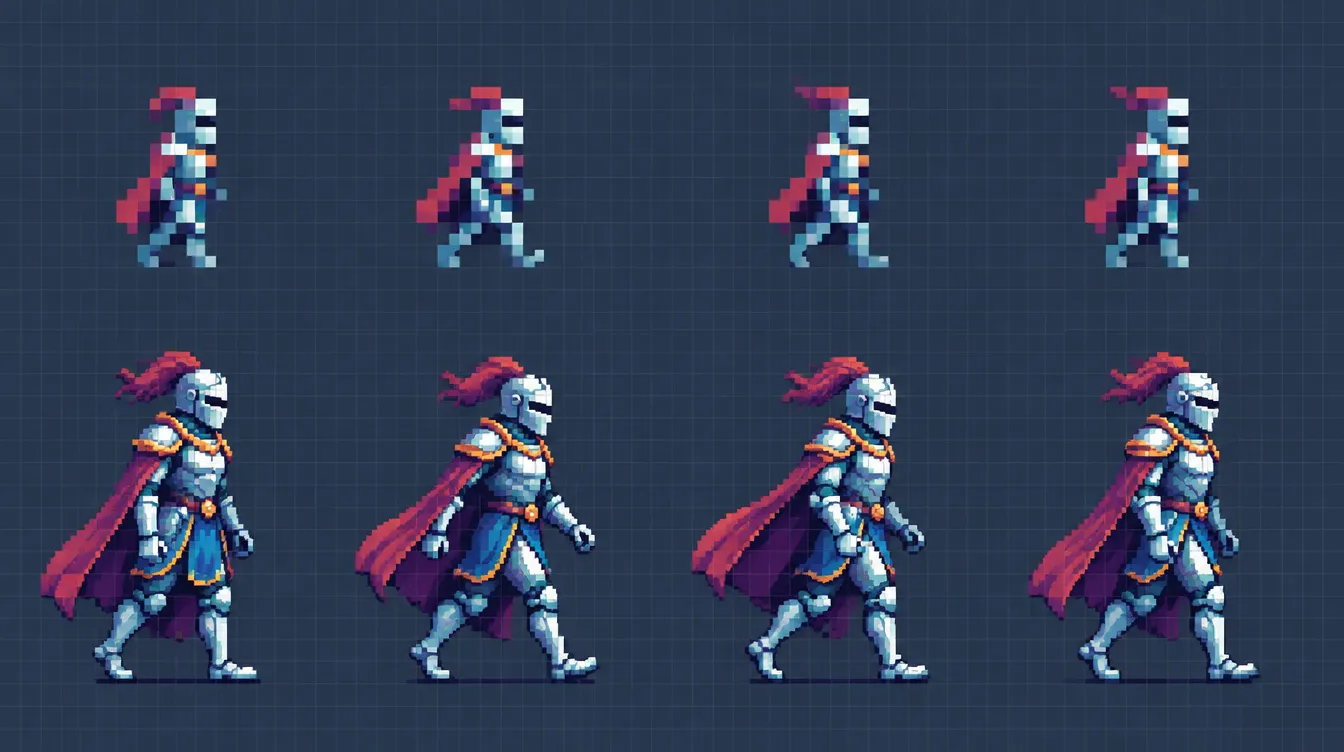
The diagram shows one simple shape at equal display size. Count the difference:
- 16×16 = 256 pixels. Every pixel is a decision. A face is two dots, a sword is a line. This size forces you to simplify, which is great practice—the fundamentals tutorial recommends exactly this kind of small sprite for daily exercises.
- 32×32 = 1,024 pixels, four times as many. Room for a readable face, simple clothing folds, a clear silhouette with some personality. A comfortable middle ground for characters.
- 64×64 = 4,096 pixels, sixteen times as many as 16×16. Now you’re shading muscles and fabric. It looks rich, but it’s closer to painting than to classic pixel art.
Now combine sprite size with base resolution. On a 640×360 canvas, a 16-pixel tile grid gives you 40 tiles across and 22.5 tiles down (640/16 and 360/16). With 32-pixel tiles you get 20 across and 11.25 down. Notice the half and quarter tiles: 360 doesn’t divide evenly by 16 or 32. That’s fine for a scrolling game, where the camera rarely shows an exact tile grid anyway. If you’re building a single-screen puzzle game, though, plan your board size around it.
A useful check: how much of the screen height does your main character fill? A 32-pixel hero on a 640×360 canvas fills about 8.9 % (32/360). The same 32-pixel hero on a 320×180 canvas fills about 17.8 % (32/180)—twice as large, with half as much world visible around it. That’s a design decision as much as an art decision.
Step 5: Weigh Detail Against Workload
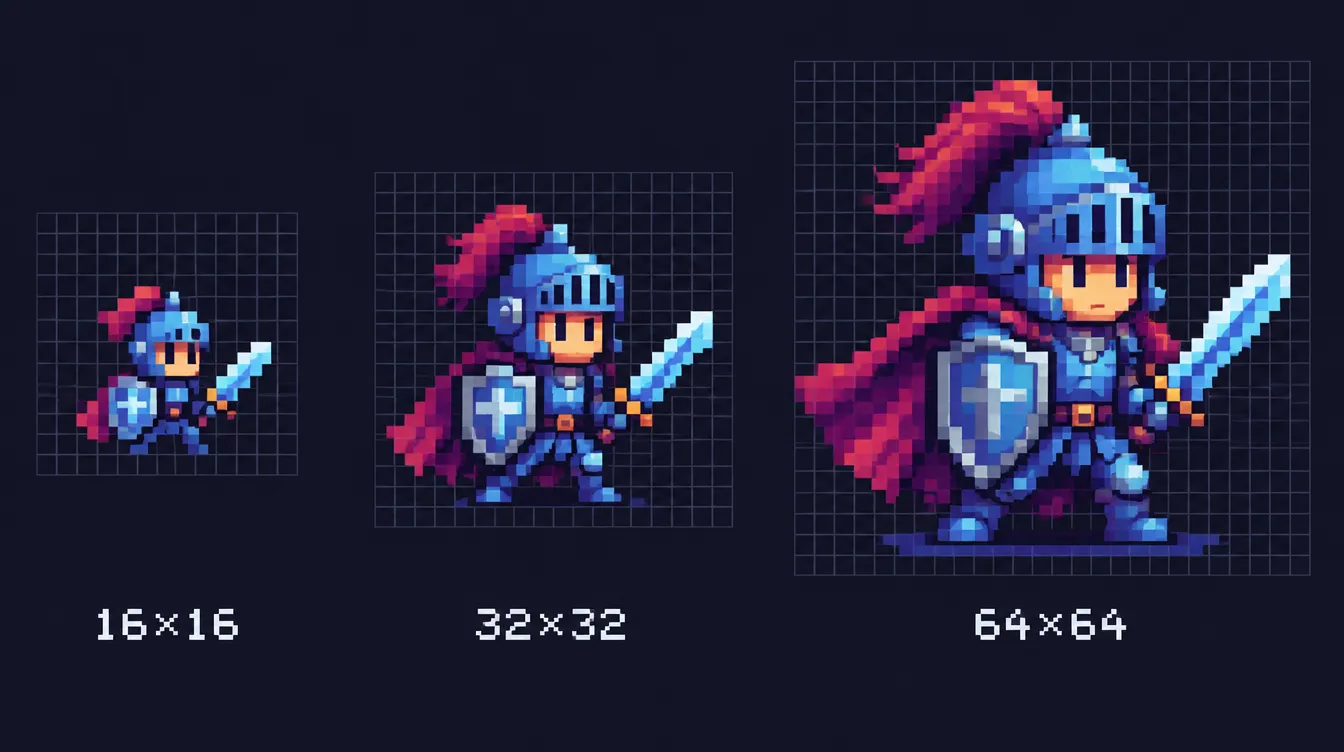
This is where many hobby projects stall. The pixel count doesn’t grow in a straight line with the side length—it grows with the area. Double the side, and you have four times the pixels.
And games don’t have one sprite. They have animations. Take a character with an 8-frame walk cycle:
| Sprite size | Pixels per frame | Pixels for 8 frames |
|---|---|---|
| 16×16 | 256 | 2,048 |
| 32×32 | 1,024 | 8,192 |
| 64×64 | 4,096 | 32,768 |
Not every pixel costs the same effort—you won’t redraw the background of a frame by hand. But the trend is clear: going from 16 to 64 multiplies the raw material by sixteen, for every frame, every direction, every enemy.
So ask yourself honestly:
- How many characters and animations does your game need? Many enemies with many states favor smaller sprites.
- How much time do you have per week? If you draw in the evenings, 16 or 32 pixels keep your project finishable.
- What does the gameplay need to communicate? If players must read facial expressions, 16×16 might be too tight.
There’s no “correct” size. There’s only the size you can finish at the quality you want.
Step 6: Lock It In Your Engine (Godot 4, Briefly)
Your engine needs to know about your decision, otherwise it will happily smooth and stretch your pixels. Here are the settings that matter in Godot 4. Both sources describe them; I’ve only listed what they say.
- Base resolution: In Project → Project Settings → Display → Window, set Viewport Width and Viewport Height to your base resolution, for example 640 and 360 (GDQuest).
- Stretch Mode
viewport: In the same section, set the Stretch Mode toviewport. According to the Godot docs, the root viewport is then set exactly to your base size and scaled up as a whole. GDQuest recommendsviewportfor a classic, uniformly pixelated look andcanvas_itemsif you need smooth camera movement, tweens and particles. - Scale Mode
integer: Change the Scale Mode fromfractional(the default) tointeger. Godot then rounds the scale factor down to the nearest whole number—exactly the behavior from Step 3. - Texture Filter
Nearest: Turn on Advanced Settings at the top right of the Project Settings window, go to Rendering → Textures and set Default Texture Filter toNearest(GDQuest). Without it, your sprites get blurred when they’re scaled.
On versions: the Godot documentation says the stretch scale mode setting exists since Godot 4.2, while GDQuest names Godot 4.3 or later as the requirement for integer scaling. Use a current Godot 4 release and you’re covered either way.
That’s all you need for now. The detailed Godot setup—cameras, pixel snapping, UI at a different resolution—comes in its own tutorial.
Step 7: Test at Real Size, Early
Before you draw your full tileset, run a quick test:
- Create a canvas at your base resolution in your editor.
- Place one character sprite and a row of tiles at 1× size.
- Export as PNG (never JPEG—compression destroys the hard edges) and view it scaled to your target screen with integer scaling, or drop it into an empty engine project with the settings from Step 6.
- Look at it from your normal playing distance. Can you read the character? Does the screen feel crowded or empty?
Ten minutes of testing here saves you from redrawing fifty sprites later.
Common Mistakes
Drawing at the final screen resolution. A 1920×1080 canvas with “pixel art” brushes isn’t pixel art—the engine can’t scale it cleanly, and it takes forever to fill. Draw at your base resolution, let the engine scale.
Picking a resolution that’s almost 16:9. 426×240 looks right, but it’s not an exact 16:9 ratio and never hits 1280×720 with a whole-number factor. Run the numbers for every target screen before you commit.
Leaving fractional scaling on. It’s the default in Godot. Your art will look uneven, and you might blame your drawing skills instead of a single setting.
Forgetting the texture filter. Linear filtering blurs your sprites the moment they’re scaled. Set it to Nearest once, project-wide.
Mixing sprite sizes without a plan. A 64-pixel boss next to 16-pixel heroes is a valid choice—but scaled-up 16-pixel sprites next to native 64-pixel sprites look like two different games. Keep the pixel size consistent: never scale individual sprites by non-integer amounts inside the game.
Choosing 64×64 because it looks impressive. It does. It also multiplies your animation work by sixteen compared to 16×16. Pick the size you can finish.
Changing the resolution mid-project. Every asset, every UI layout and every level depends on it. Decide early, test once, then stick with it.
Quick Reference
- 640×360 → ×2 / ×3 / ×4 / ×6 for 720p / 1080p / 1440p / 4K
- 320×180 → ×4 / ×6 / ×8 / ×12 for the same targets
- 16×16 = 256 px, 32×32 = 1,024 px, 64×64 = 4,096 px
- Godot 4: Stretch Mode
viewport, Scale Modeinteger, Default Texture FilterNearest
What You’ve Learned
- The difference between base resolution and sprite size, and why they only work together
- How to check a base resolution for clean integer scaling on 720p, 1080p, 1440p and 4K
- What 16, 32 and 64 pixel sprites cost you in detail and drawing time
- The Godot 4 settings that keep your pixels crisp
Next up: draw your first sprite at the size you chose. The Pixel Art Fundamentals walk you through it step by step, and Color Theory for Games helps you pick a palette that reads well at small sizes.
Sources
- Godot Engine documentation: Multiple resolutions (stable docs, accessed October 2026)
- GDQuest: Setting up pixel art graphics in Godot 4 (June 2025)