A game jam is the fastest way to learn what game art really is. Not a portfolio piece you polish for weeks, but a set of assets that has to work inside a game, next to code someone else is writing, before a deadline that does not move.
If you signed up as “the art person” for a jam, this guide is for you. It is written around a month-long jam like GitHub Game Off, which runs every November and gives you the whole month to build a game around a theme. The same plan works for shorter jams: shrink the phases, keep the order.
This is not a drawing tutorial. If you have never placed a pixel, start with Pixel Art Fundamentals and the Aseprite Beginner Guide, then come back. What follows is about the decisions around the drawing, the ones that decide whether your game ships with art or with grey boxes.
What You’ll Need
- A pixel art editor. I use Aseprite; any editor with a fixed palette and layers will do.
- A palette from Lospec
- A shared place for the asset list (a spreadsheet, a text file in the repo, a board)
- 60 minutes before or on day one for the setup in Steps 1 to 3
Step 1: Lock Your Palette Before You Draw Anything
The single biggest time saver in a jam is deciding your colors once. Every minute you spend picking “a slightly different green” for a new sprite is a minute you are not drawing, and every new color makes the next asset harder to match.
Go to the Lospec palette list, filter by color count and pick a palette with 8 to 32 colors. Lospec lets you download each palette as PNG, PAL, ASE, TXT, GPL or HEX, so it loads into practically any editor. In Aseprite you load it through the palette menu, as shown in the Aseprite Beginner Guide.
For a first jam, smaller is better. A palette like PICO-8 has exactly 16 colors. That sounds tight, but it forces every sprite into the same visual family, and that consistency is what makes jam games look “designed” rather than assembled.
Before you commit, run one quick check from Color Theory for Games: can you build a clear dominant / accent / signal split from this palette? You need dark and mid tones for the world, a warm accent for the player, and one loud color for danger. If the palette cannot do that, pick another one now. Changing it on day 18 means recoloring everything.
Then share the palette file with your team. Programmers will draw placeholder UI, debug text and particles, and they should use the same colors you do.
Step 2: Choose One Sprite Size and One Scale
The second decision is your base grid. Pick one tile and character size and stick to it for the whole game.
- 16×16 is the fastest. Characters read as icons, tiles are quick, animation frames are cheap. Ideal if you are new or solo.
- 32×32 gives you room for faces and clearer poses, but every sprite takes noticeably longer, and so does every animation frame.
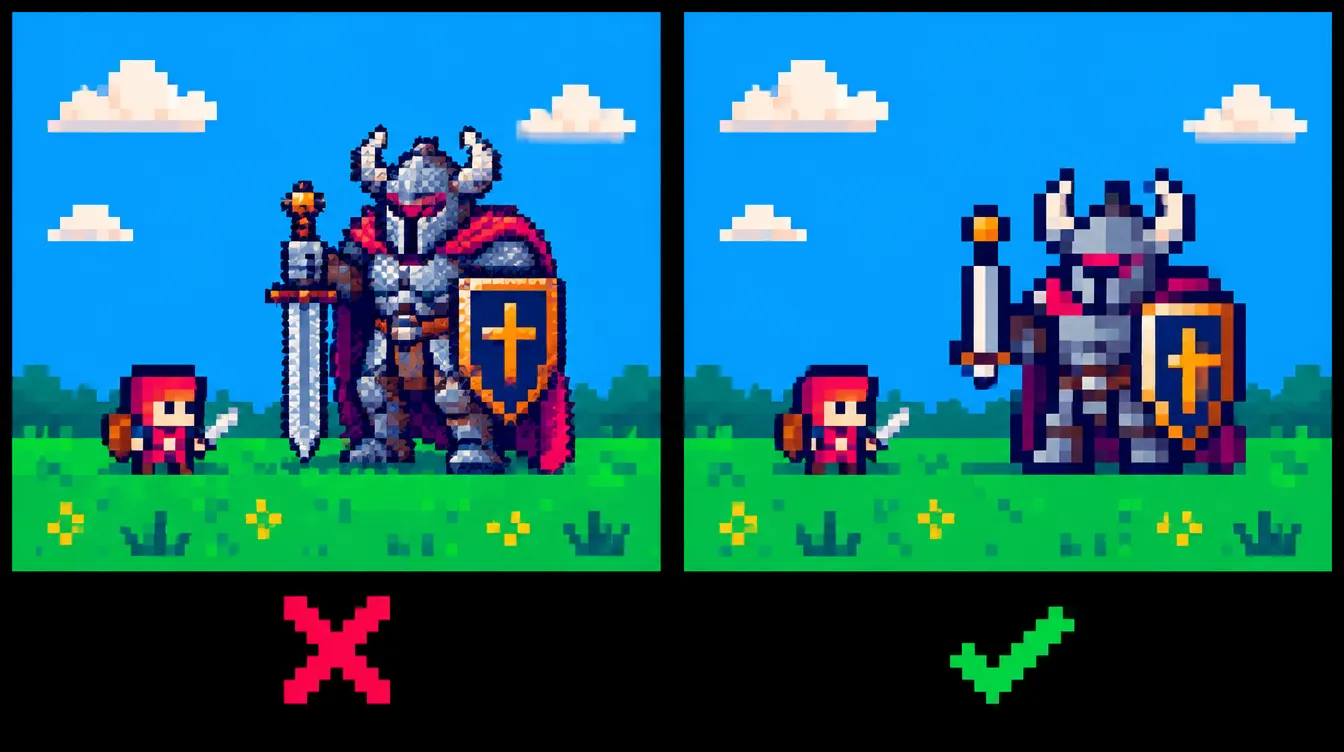
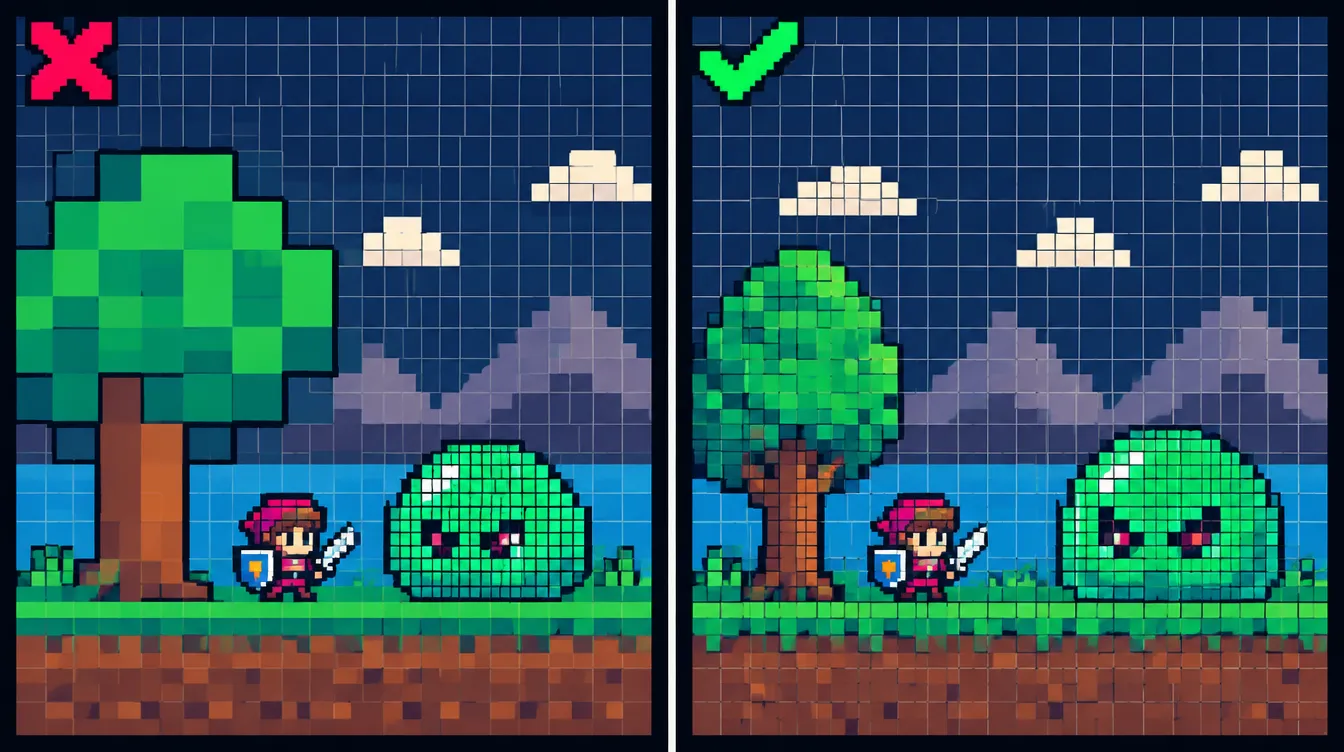
Whatever you choose, keep the pixel scale identical across all assets. A 16×16 hero next to a 64×64 boss that was drawn at a finer resolution and scaled down looks wrong to every player, even if they cannot say why. A big enemy is fine; a big enemy with smaller pixels is not.
Agree on the game’s base resolution with whoever sets up the engine. A common choice is a low internal resolution such as 320×180, scaled up by whole numbers. 320×180 scales exactly by 6 to 1920×1080, and with 16×16 tiles it gives you a screen roughly 20 tiles wide. Whole-number scaling and nearest-neighbor filtering in the engine keep your pixels sharp. Ask your programmer to set that up on day one, not at the end.
Step 3: Write the Asset List and Prioritize It
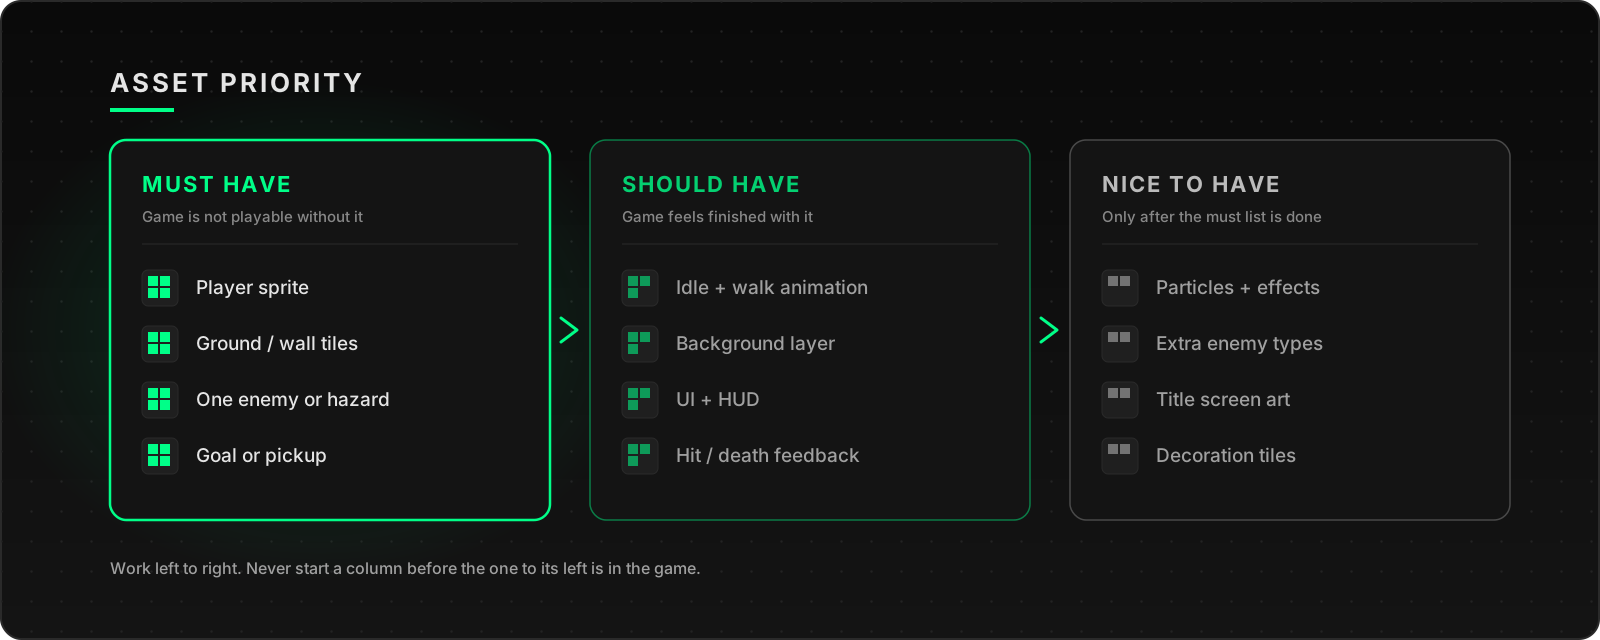
Once the theme is out and the team has a game idea, write down every piece of art the game needs. All of it: the player, each enemy, every tile, the UI, the title screen, the itch.io page image. Then sort it into three columns.
Must Have
Without these, the game is not playable or not understandable. Usually: the player sprite, ground and wall tiles, one enemy or hazard, and whatever the player is trying to reach (a goal, a pickup, an exit). This list should be short. If it has more than eight or ten entries, the game idea is probably too big for the time you have.
Should Have
With these, the game feels finished: idle and walk animations, a background layer, UI and HUD, hit and death feedback. Feedback matters more than it sounds. A one-frame white flash when something takes damage does more for game feel than a detailed background.
Nice to Have
Particles, extra enemy types, decoration tiles, an animated title screen. This column is where scope creep lives. Write it down so the ideas are not lost, then ignore it until the first two columns are in the game, not just drawn.
Put the list where the whole team sees it and mark each asset with one of three states: placeholder, first pass, final. That makes it obvious what still blocks the game.
Step 4: Follow a Four-Phase Schedule
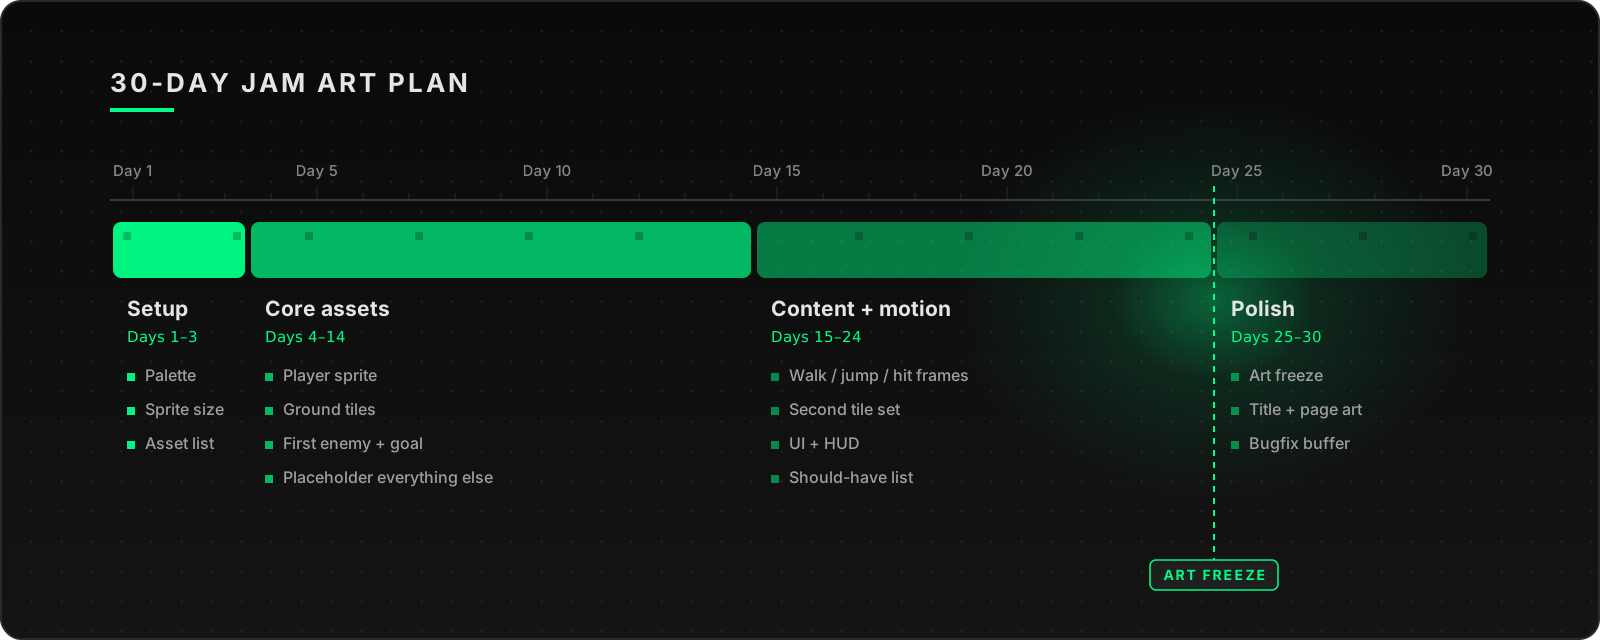
A month feels long on day one and short on day twenty. Splitting it into phases with clear exits keeps you from polishing the player sprite for two weeks while the game still has no tiles. The diagram at the top of this guide shows the plan; here is what each phase means.
Phase 1: Setup (Days 1–3)
Theme, game idea, palette, sprite size, asset list. That is Steps 1 to 3 of this guide. Resist the urge to draw finished art yet. If the idea changes on day two, finished art is wasted; a palette and a grid survive almost any change of plan.
Phase 2: Core Assets (Days 4–14)
Draw the must-have column. Start with the player, because the programmer needs something to move around, then ground tiles, then the first enemy and the goal. Everything else stays as a placeholder: a colored rectangle in the right size and in a palette color is enough.
Get each asset into the game as soon as it exists. Art that looks great in the editor can fall apart at game speed, against the actual background, at the actual scale. You want to find that out on day 6, not day 29.
Phase 3: Content and Motion (Days 15–24)
Now the should-have column: animation frames for the player (idle, walk, jump, hit), a second tile set if the game has more than one area, UI and HUD, damage feedback. Keep animations short. Two to four frames per action is plenty for a jam, and a clean two-frame walk beats an unfinished eight-frame one.
Phase 4: Polish (Days 25–30)
Day 25 is your art freeze: no new assets after that, only fixes. Use the remaining days for the title screen, the image for the jam page and screenshots, and a buffer for the bugs that always appear when everything comes together. If the nice-to-have column got anything at all, that happened in Phase 3 because you were ahead, never here.
For shorter jams, keep the proportions. In a 48-hour jam, Phase 1 is the first two or three hours, and the art freeze comes several hours before the deadline.
Step 5: Work in Passes, Not in Masterpieces
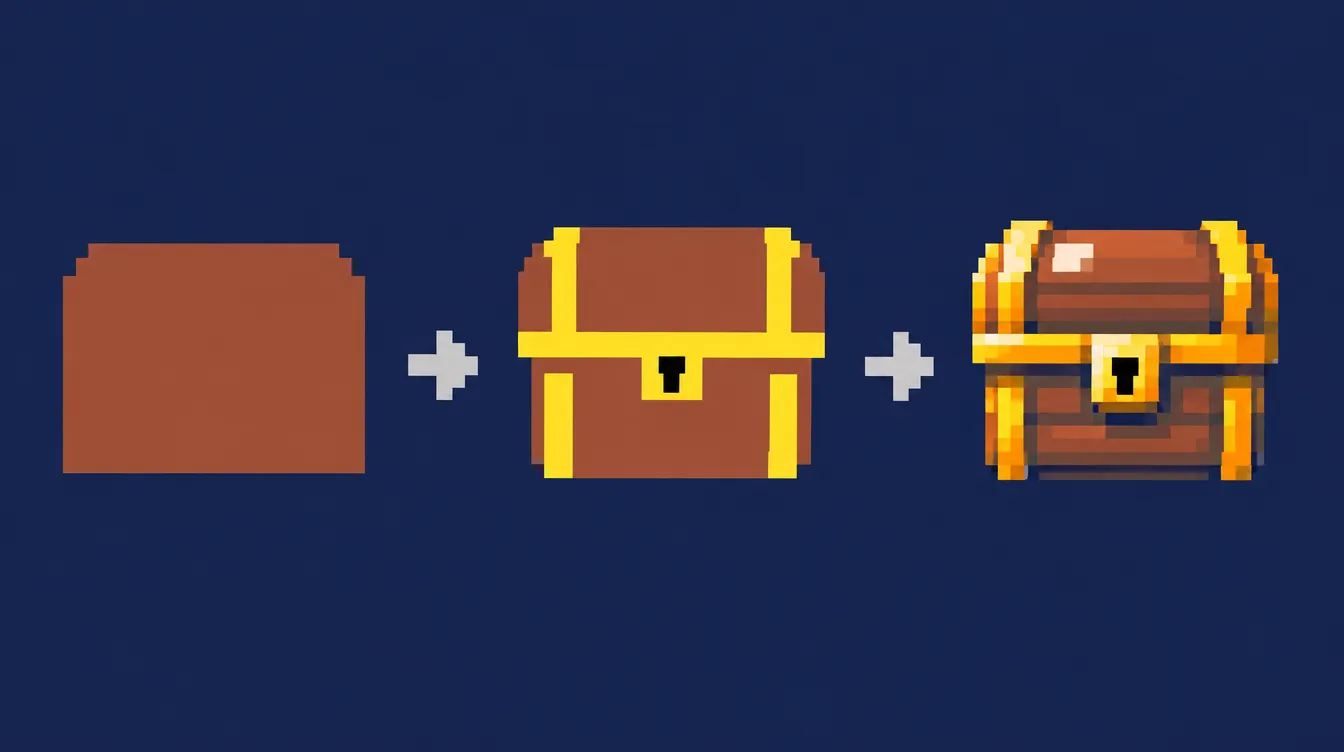
The schedule only works if you accept that every asset goes through the game at least twice.
- Placeholder: right size, right position, one palette color. Takes seconds.
- First pass: readable silhouette, base colors, no detail. This is “done” for the must-have column.
- Final: shading, outlines, small details, only if time allows.
Get the whole must-have list to first pass before you take any asset to final. A game where every asset is at first pass looks consistent. A game with one gorgeous player sprite and grey boxes everywhere else looks unfinished, no matter how good that one sprite is.
Common Mistakes
Picking the palette after the first sprites
Drawing first and “choosing colors later” means recoloring every asset later. Lock the palette in Phase 1, even if it feels premature.
Mixing pixel scales
Scaling a sprite up or down in the engine, or drawing a boss on a finer grid, breaks the look instantly. One grid, one scale, whole-number scaling only.
Polishing the first asset forever
The first sprite you draw is the one you are most excited about, and the one most likely to change once the game exists. First pass, into the game, move on.
Art that never reaches the game
An asset that sits in your folder does not count. Hand it over (or commit it) the same day you draw it. Agree early on file names, export format and where files go, so handing over takes a minute rather than a conversation.
Ignoring readability at game speed
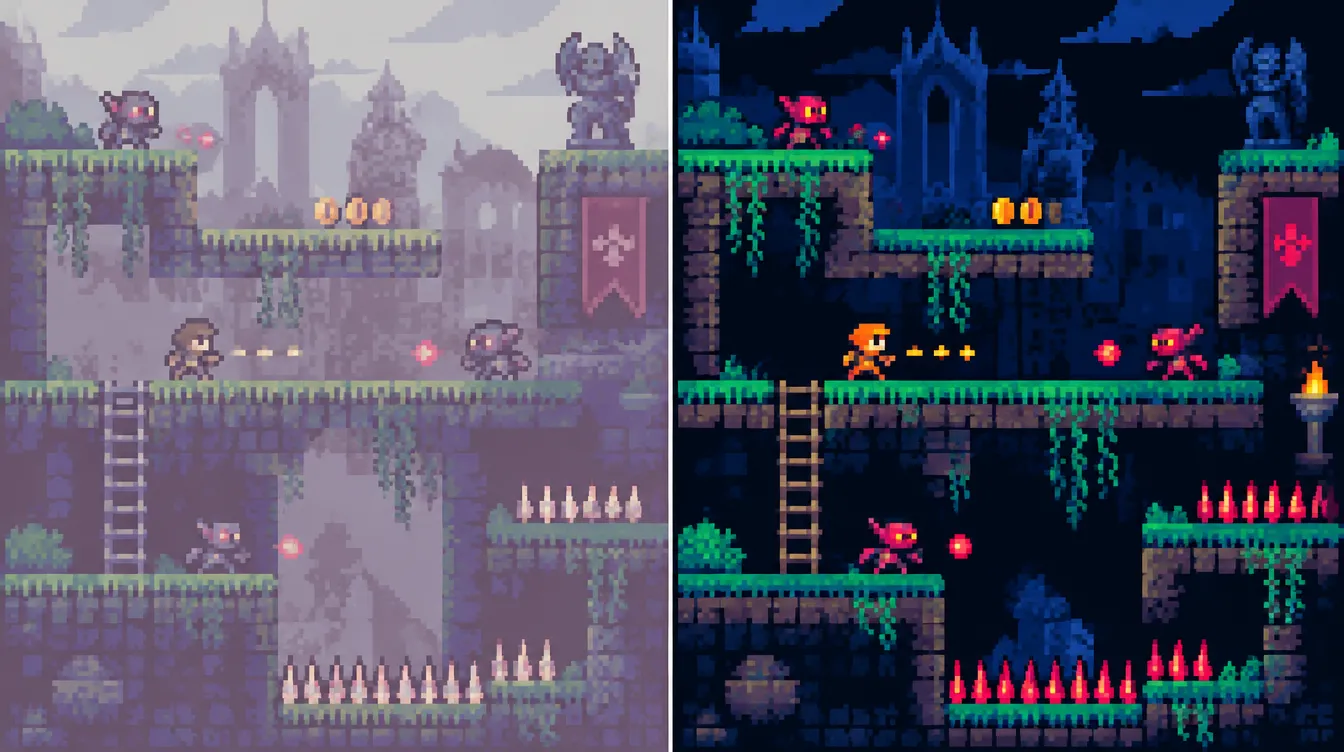
Detail you can see while zoomed in at 800% disappears when the sprite moves. Check every asset at the real game scale: can you tell the player from enemies and hazards from decoration at a glance? If not, push value contrast before adding detail, as covered in Color Theory for Games.
Not reading the rules
Every jam has its own rules about pre-made assets, team size and what must be created during the event. Read the rules page before day one. Game Off, for example, asks participants to share their code in a public GitHub repository (Wikipedia); check the current edition’s page for everything else.
Skipping sleep and the buffer
The last days always take longer than planned. The art freeze exists so that the final weekend is for fixing, not for drawing.
What You’ve Learned
- Why locking a palette on day one saves more time than anything else
- How to choose one sprite size and keep one pixel scale
- How to split your asset list into must have, should have and nice to have
- A four-phase schedule with an art freeze that works for a month or a weekend
- Working in passes so the whole game reaches a consistent level
A jam is not about making the best art you can. It is about making enough art, consistent enough, early enough, that the game can be played. That skill transfers to every bigger project you will ever work on.
Ready to start? Set up your canvas with Pixel Art Fundamentals, load your palette in Aseprite, and write your asset list before you draw a single pixel.